Tragic Kingdom: Issun…kinda

Picture it….

Sitting, huddled in a blanket, surrounded by nachos, fingers about to dance across the keyboard as if composing a rousing concerto as I rig like a mad man!

….then a hurricane comes, creates a storm, launches a lightning bolt down at my little ol’ cottage atop a big tall mountain and BEWM goes my computer’s motherboard and power supply. And my life for the next 5 days. Sad as that is.

Silver lining is I got a newer, better computer out of it, but it’s set me back a bit progress-wise. Ah well. I’ve decided to post what I did today anyway, between the other stuff, as some have expressed an interest in the rigging portion of it all. From here on in, I will likely be taking a break from Issun and TK in general, as I’ve been asked to be part of a small animation project and will be dedicating myself to that entirely, and using whatever spare time I have to (finally) build that website I keep talking about.


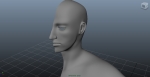
Orienting the joints before parenting

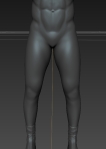
Testing the IK handles for the leg animations.

I did warn it wasn’t much 😛 Busy busy busy. On another note, this rig when it’s finished will of course be a bit more in-depth than the first one, which was basically made for a specific pose, one not very demanding at that. I decided to start from scratch, because rigs tend to be fickle things when working backward. That and they’re fun to build ❤

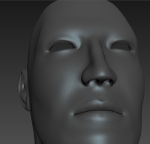
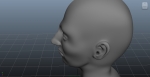
On another note, I just realized I never posted a screenshot of the very low-poly model after the textures and normal mapping were applied:
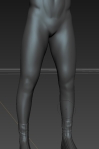
 

Tragic Kingdom: Issun-Boshi 4 – Texture

This is part of the sculpt update, time just got the best of me yesterday. At this point, the base texturing is complete, though I’m still going back and forth on the possibility of camera close-ups on the face. It may be that heads get their own maps, haven’t completely decided yet. For now, I’m really happy with how these came out:

I’m working on a custom design for a tattoo sleeve now for the right arm and chest. That will eventually be part of the design, but I’ve never done one before so it might be a while before I settle on something I find pleasing. In the meantime, I’ll be focusing on rigging and animating most likely, and will also be getting started on a female base mesh which will then be incorporated into the designs of more characters to come.

The texturing took ~many~ hours of blending high-res photos of actual people with painting and compositing techniques for something realistic and attractive. I must admit though, while I’m happy with the results, I texture sort of begrudgingly; to me, models always look their best in gray.

Hey there’s a thought…a complete black & white aesthetic :O

Tragic Kingdom: Issun-Boshi 3 – Sculpt

Big ol’ update! The sculpt took a lot of time and I didn’t get to add as much detail as I’d have liked. My computer, as it turns out, can’t handle going above level 5 in Mudbox, out of memory errors galore. Fortunately I have a newer, stronger computer coming in soon, but in the meantime I’m pretty happy with the detail I pulled out of this guy at a medium resolution.

I toyed around with a few different ideas for musculature, but in the end I went for something more realistic and ‘attainable’ rather than comic book amounts of muscle and sinew. That’s never really been my preferred style….ironic since I still read and love comics.

Yes, I’m a geek.

Tragic Kingdom: Issun-Boshi 2 – Modeling

So, the modeling was actually very easy thanks to my prior work on a base male mesh “Kai”. I only had to reroute a handful of edgeloops to get the topology I wanted, and the face was largely pushing/pulling verts to get the desired facial features.

I’m rather happy with how he came out. I’m also waaaay under my poly budget, set at 20,000tris and only coming in at 10k. This is meant to be a one-on-one fighting game, so I have a lot of elbow room with polys, even more considering how under budget I came in for this particular Issun costume (I’m planning several for each character). From here, he’ll be UV Mapped and taken into Mudbox for sculpting and eventually normal mapping. I’ll post those results when they’re ready!

Base 18: Environment

Technically, the mesh is done, but as he was part of an assignment, I decided to give him an environment and animate a fly-through as well. It was a lot of work (all of this happened over 5 weeks), but it was worth it to get to pose the model and really flex the artist muscles.

The first thing I did, with the help of an environmental artist friend of mine, is spruce up and refine the design of an existing environmental concept. I was going for a sort of mystical spring at night, surrounded by trees. The backdrop was painted first, to reduce some of the workload, and placed on a flat surface. Two other planes were then created, one for the ground, and one for the water.

Next, the topology of the land is created with a combination of soft selection and manual dexterity.

Now, I’ve created some spheres and molded them into what, with texturing, will become runic rocks.

Next, the first tree is created from a cylinder, the branches extruded from select faces.

Some additional loops are created to define shapes, and give me more room to shape both the trunk and branches. As the tops of the trees will not be (generally) visible, they are left out.

The tree is then duplicated and further manipulated to go along with the original concept art painting.

The initial concept art is here. The couple in the water are sketched by me, the background was painted by the ever-talented Scott Xie, my friend and trusted environmental artist.

The video fly-through will be uploaded to the website and the link updated and posted here once that’s done. In the meantime, here’s a screenshot. As you can see, mushrooms were added to the trees, as well as water reeds, to give the environment more life.

Thanks for following along, folks!

Base 17: Skinning

This part is relatively easy, but time consuming, so I didn’t document too much of it. Basically, it takes part in two steps…two very loooooooooooong steps. First, use Maya’s capsules to get the general shape of the weights.

After that’s done for the various joints of the body, I then go in and manually fix it up with the weight painting tool. Not hard, but a little tedious. I had music to keep me company and keep it from getting boring.

Once all that’s done, we have the final rig.

Base 16: Rigging

Rigging is something I used to be afraid of, until I dove right in and discarded all apprehension. It’s actually rather fun, once you get the hang of it! The start is pretty straight-forward. For now, I just need a very basic rig. When I have a clearer idea of what I’ll need this model for, I can go in and tailor the rig to the project.

Once the profile-view joints have been placed, I move on to the arms. This is where it gets a little annoying. I’ve left my model in a relaxed T-pose to help maintain proper deformation during animation. It’s probably the better way to rig, but it does complicate some thing a bit. Moving joints around and trying to align them perfectly takes some time, and Snapping only shortens the workload so much.

The hands are done next, aligning them both with the mesh and the axis of the joints as well.

And that’s pretty much it! I mirror the arm and leg joints over to the other side, which is literally just a few button clicks. Afterward, I start building in the controls with which to manipulate the rig.

Special thanks to Digital Tutors for showing me some tips and tricks along the way!

Base 15: UV Mapping

While he’s not up for texturing as a base asset, I still want him UV mapped and ready to go. Each part of his body is isolated with a planar map, then connected where relevant in the UV window. While pelt mapping and other more automated tools are potential alternatives, I don’t feel they give me the control that comes with more manually dexterous methods when time allows.

Most if it is relatively straight-forward. The head tends to boggle some people though, so I’ve documented how I do it more carefully. First, I planar map each section separately: the face, the top of the head, the left and right side of the head/ears, the front of the neck, the left and right side of the neck.

Afterward, the UVs are stitched together so it’s one, flat piece.

Finally, the UVs are relaxed to provide even distribution of the UV Space. Notice the unavoidable seem is placed in the most inconspicuous area near the back top of the head, where hair is most likely to occupy and in the event of a bald style, where camera and shadow will obscure any potentially noticeable texture seams.

And here’s the final map.

Base 14: Completed Model + Count

And here’s the full model! I eventually played with him a bit more to tweak him for the final, recessed his forehead a bit and modeled some hair. Otherwise, here’s Kai!

Oh, almost forgot. I also took a look at the polycount and moved some things around to get it lower. What you see there in the upper right corner is the polycount of the subdivided, smoothed preview, so you’ll want to divide that by half to get the actual value: 1901 (roughly). Not too shabby at all. With proper normal mapping, the lower-poly version can look pretty close to that smoothed version without sacrificing on polycount. I generally use a subD proxy for general rendering instead, though.

Next, mapping and stuff.

Base 13: Ears

Ironic this should end up step 13. I’m not a big fan of modeling ears. They’re a necessary evil, but they’re also incredibly complex. I’ve seen people call this part “easy with practice”, but it’s yet to feel that way for me. But then I’ve seen those same people complain about hands, which I love, so…it works out.

Step one, draw the ear loops, followed by step 2, lovingly titled: delete stuff.

Next, I chose to isolate the ear and work on it without the head. I’d attach it again later, but this way I don’t get boggled down trying to work around a transparent mesh, clicking and dragging the wrong verts accidentally and what not. I start pulling out the connective flesh and shaping the lobe.

Now to shape the ear a bit more, I add a loop to give me more edges to work with, push pull and connect a few things and…

Now it’s really just a matter of molding it like clay, now that the map is drawn, in a sense…

Finally, it’s reattached to the head. I pull out the lobe just a bit more later on, and pull the upper ear away from the head more, but otherwise it’s done.