Mubjub the Imp

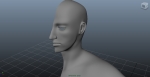
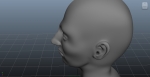
This little guy is named Mubjub, one of two imps that are the star of the upcoming film short. I had tried to push back showing him off until the texture and clothing artists were finished with him, but the holidays are punching gigantic holes in the production schedule and pushing things around a bit. No worries, I’ll be making posts along the way as we work through production, so his completed model will be shown off eventually. Very fun, Mub in particular is growing on me. I’d love a little doll of him.

mub_3

Mub_Polys

mub_polys2

Mubjub_complete

I tried something new with his eyes to create a more realistic eyeball, using two spheres instead of one. The sphere overlay is translucent with the shine you see, and also maintains the round silhouette of the eye while the inner sphere creates the eye itself and a sunk-in center for the iris. Even without textures, it looks like an eye, and when textured should look quite nice. In order to keep his eyes very cartoony while still being able to later animate a blink, he has very tiny lids circling the eye, barely noticeable without an extreme close-up. The other option was to animate via texturing, but I’m not a big fan of that technique. Works lovely for some cel-shaded animations but catch the model at the wrong angle during animation and the immersion is killed.


Tragic Kingdom: Issun-Boshi 2 – Modeling

So, the modeling was actually very easy thanks to my prior work on a base male mesh “Kai”. I only had to reroute a handful of edgeloops to get the topology I wanted, and the face was largely pushing/pulling verts to get the desired facial features.

I’m rather happy with how he came out. I’m also waaaay under my poly budget, set at 20,000tris and only coming in at 10k. This is meant to be a one-on-one fighting game, so I have a lot of elbow room with polys, even more considering how under budget I came in for this particular Issun costume (I’m planning several for each character). From here, he’ll be UV Mapped and taken into Mudbox for sculpting and eventually normal mapping. I’ll post those results when they’re ready!

Flashback!

Thought I’d post some other things I’ve done in the past!

The following is a screencap of a character I was working on, an older man, sort of vampiric and demony. The background is a placeholder, I haven’t gotten around to giving him his own yet. I’m thinking I might just paint him one, it might look quite nice that way. I haven’t really decided, yet.

Next up, a more recent project. During my production classes, we all chose to do an animation short called Buns N’ Guns. Everyone was given specific roles, environment artist, concept artists, texture artists, etc. I was the character modeler of the class. There were three main characters, which are below. I managed to finish modeling them in time to help Animate 3 scenes as well, which is great. I love animating, I don’t always get to do it. Oddly, I don’t have screenshots of the Female alien anywhere, I need to go looking for her. In the meantime, the third shot is a scene from one of the parts I animated, and you can at least see her from the back for now.

That’s it for now. Eventually I’ll scour through all these folders and find more 3d stuff to plunker down here. I think I’ll post some 2d stuff next, though…

Base 18: Environment

Technically, the mesh is done, but as he was part of an assignment, I decided to give him an environment and animate a fly-through as well. It was a lot of work (all of this happened over 5 weeks), but it was worth it to get to pose the model and really flex the artist muscles.

The first thing I did, with the help of an environmental artist friend of mine, is spruce up and refine the design of an existing environmental concept. I was going for a sort of mystical spring at night, surrounded by trees. The backdrop was painted first, to reduce some of the workload, and placed on a flat surface. Two other planes were then created, one for the ground, and one for the water.

Next, the topology of the land is created with a combination of soft selection and manual dexterity.

Now, I’ve created some spheres and molded them into what, with texturing, will become runic rocks.

Next, the first tree is created from a cylinder, the branches extruded from select faces.

Some additional loops are created to define shapes, and give me more room to shape both the trunk and branches. As the tops of the trees will not be (generally) visible, they are left out.

The tree is then duplicated and further manipulated to go along with the original concept art painting.

The initial concept art is here. The couple in the water are sketched by me, the background was painted by the ever-talented Scott Xie, my friend and trusted environmental artist.

The video fly-through will be uploaded to the website and the link updated and posted here once that’s done. In the meantime, here’s a screenshot. As you can see, mushrooms were added to the trees, as well as water reeds, to give the environment more life.

Thanks for following along, folks!

Base 17: Skinning

This part is relatively easy, but time consuming, so I didn’t document too much of it. Basically, it takes part in two steps…two very loooooooooooong steps. First, use Maya’s capsules to get the general shape of the weights.

After that’s done for the various joints of the body, I then go in and manually fix it up with the weight painting tool. Not hard, but a little tedious. I had music to keep me company and keep it from getting boring.

Once all that’s done, we have the final rig.